Here's a quick and easy fix for anyone who's struggled with using HTML with Dynamics CRM emails.
This was born of my need to update the source code of the email body via JavaScript in order to achieve my "Insert email signature" Button. I was digging around with the Email entity in IE8 Dev tools, and uncovered a potential holy grail of mouthwatering CRM deliciousness..........The "InnerHTML".
How lovely this was.
Upon completion of the Button, I then realised that if you could write to this InnerHTML via JavaScript, you could surely pass in an existing email's 'source code' into a text area, tweak as required and put it back where it belongs.
And better still, Create a tasty Web based mail with full images, styles and tables using any web content tool and replace the existing mails "InnerHTML" with your source code.
And you know what? It works! - So here's my quick step by step instruction on how to get yourself a new Section of the CRM email entity to edit the source code of your CRM emails.
1) Navigate through Settings-->Customize Entities-->Email.
2) Under Attributes, click NEW.
3) Create an attribute of type: nText, Display name = HTML, maximum length = 50000
(the Name should auto-resolve to new_html, if your organisation used an alternate prefix, please note it down for coding later)
 4) Save and close.
5) Under Forms and Views, select the main application form.
6) Under common tasks, click add a tab, name it "HTML" or "Source Code" etc.
7) Add a section, and add your recently created attribute new_html.
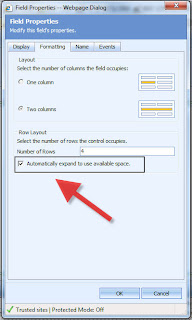
8) Change the properties of the attribute, and expand the area to fill the page. (see right)
Now for the 10000 pages of code...
9) Under form properties, paster the following into the OnLoad event and Enable the event, save and close
//Copy existing Inner HTML and replicates as editable test in New HTML Tab
crmForm.all.new_html.DataValue = document.all['descriptionIFrame'].contentWindow.document.body.innerHTML
10) Double click the description attribute, Select the event tab and paste the same code above into the OnChange - enable the event.
11) Navigate to your new tab on the main form, and double click you nText attribute to open it's properties
12) Paste the following code under the OnChange of the new_html attribute, enable the event.
//Takes the changes made to the new HTLM tab and applies to the CRM Email Body
document.all['descriptionIFrame'].contentWindow.document.body.innerHTML = crmForm.all.new_html.DataValue
document.all['descriptionIFrame'].contentWindow.document.body.innerHTML = crmForm.all.new_html.DataValue
Now when you open a new email, you will have an an additional tab to control the HTLM content of your emails, this of course opens many doors to some bespoke formatting that cannot be done with the out of box features.
Ps! - If you're playing with images, make sure you use absolute references to hosted files. otherwise, the email that appears in your preview may trick you to thinking that the recipient will also see the images, and they wont.


No comments:
Post a Comment
Thanks for your comment
Craig Hamer