Thursday 24 January 2013

THE CRMUG EVENT - ROME 2013

Hi Internet,

Just a quick note to say that I will be attending the CRMUG Event in Rome,  Jan 31st & Feb 1st.

Click to view the CRMUG Event Page

I'm looking forward to getting involved with the group development Workshops, but most of all the MVP round table discussion.  If you're reading this, and also booked to attend, please don't hesitate to say hi!

All the best,
Craig


Friday 2 November 2012

Click To Enable Gridview & Future plans

Well, hello there "Internet".

It's been a while since I've blogged, I currently have 6 unpublished articles that I just cant seem to get out due to time constraints.  However, this is one of those "quick wins" that I haven't seen anywhere else that I wanted to share.  Going forward, I'm likely to dispose of the "written" form of blogging, and focus on live demonstrations and training, I've set up a YouTube channel here, and I'll be linking these back to the main blog.  Now, On the the little thing I'd like to share.

The senario is as follows...
A user creates a new entity or activity, and fills out  the fields they need.  The form for this entity also has a gridview of related records, and as we all know this gridview control are disabled until the parent entity is committed to the database.  The result being, a user completes all fields required on a form and the saves the record.  This will allow them to click the grid, and use the ribbon control to "add new record"

OK, this will sound "petty" to most of you, because you're a developer, and as such, this isn't an issue. But imagine you're using the system day in, day out, saving and adding lines, all day long.  It's only one extra click, and it's standard functionality after all? but we need to push ourselves past this to ensure that the end user is getting the best value of the product and you will be surprised how much positive feedback you get when you introduce "the little things". So here's one of my "little things", that really enhance the users experience   A few simple lines of JavaScript, that one implemented allow the user to "flow" through the CRM form much better.  I call it, saveOnClick (aptly)
/*********************************************************************
On click event for pre-save disabled grid views
for new entities. Save on click, to reduce user steps.
saveOnClick(ctrl) - Pass in control ID on form
*********************************************************************/

function saveOnClick(ctrl) //ensure control passed is "Quoted"
{
    var control = document.getElementById(ctrl);
    if (control != null) 
    {
        control.attachEvent("onclick", doSave);

        function doSave() 
        {
            Xrm.Page.data.entity.save();
        }
    }
}
Applying this simple function to an onLoad event, while passing in the grid view control ID, enable a user to click the grid and auto-save the record.

Monday 22 August 2011

Toggle Navigation element's visibility programmatically, for all relationship types.

Hello "The Internet"

In day to day working with Dynamics CRM 2011, an issue you may come across when customizing an entity is controlling the navigation pane items programmatically.  With Dynamics CRM Version 2011, It’s much more straightforward to add and remove the navigation pane objects, by using the form customisation screen, a feature not available in version 4.0 where a sitemap edit was required to remove these elements.

This works great and fits most requirements, but I want my navigation pane to be "dynamic", to show only relevant links, which are based on the form context. In this example, I will assume I have loaded a Contact record, and my navigation bar will need to hide or reveal the related entities depending on the contact type (optionset).

For the purposes of this post, I wont be giving a walkthrough on how to register form events, I'll be focusing on functionality only.  If you want an end to end demo, feel free to leave a comment :).

A standard approach to this is to use the following syntax
  Xrm.Page.ui.navigation.items.get()
passing the Nav bar element ID,  and controlling it’s display style like so...

//Ensure navitem is "quoted" to represent string
// bool: true = Visible, false = removed
function showNavItem(navitem, bool) 
{
var objNavItem = Xrm.Page.ui.navigation.items.get(navitem);
objNavItem.setVisible(bool);
}

Using this approach, you can build up your business logic to hide or reveal the elements based on the contact type as follows.

function controlNavElements() 
{
    //this returns the numeric value of the optionset
    var contactType = Xrm.Page.getControl("customertypecode").getAttribute().getValue();

    if (contactType == 100000000)
    // Contact type A
    {
        //Display nav element 1 and Hide Nav element 2
        showNavElement(navelement1, true);
        showNavElement(navelement2, false);
    }
 else if (contactType == 100000001)
    // Contact type B
    {
        //Hide nav element 1 and display Nav element 2
        showNavElement(navelement1, false);
        showNavElement(navelement2, true);
    }
 else
    // Neither type A or B
    {
        //Hide both Nav elements
        showNavElement(navelement1, false);
        showNavElement(navelement2, false);
    }
}

Controlling Navigation Items, where the entity is related by (N:N) many-to-many.


The example above will work jsut fine when hiding Navigation pane elements, where the entity has a parental relationship. (eg, A contact’s relationship to it’s activites). In instances such as these, The Element ID of the Navigation pane object does not change, and your script will work with any contact you have open.

N:N relationships are different!


If you use the IE developer tools (F12), and use the “select element by click” tool, when selecting a Navigation element to an N:N related entity, you’ll see something like this as the ID value.


navnew_contact_otherentity{5e62a1bb-c3cd-497e-aea1-d23dc85dd623}


The ID, is suffixed with a guid, which is the ID of the open record. This is how Dynamics displays the related entities when you click the Navigation Item.

With that in mind, my previous display functions are useless for N:N, as the ID itself will be different for every contact record that is open. What you’ll need, is a function that ignores the GUID part of the N:N element, but unfortunately there no “out of box” function I’m aware of that does this.

So here it is…

My work-around is to loop through all Navigation pane elements, each time checking for the prefix of the element ID (which remains constant) if a match is found, it will update its display properties.  This allows you to use the following function, irrespective of the relationship type.

/***********************************************************************************
navElementDisplay

## Param 1:  navElementID ##
For standard N:1 relationships, pass the ID in it's entirety, for N:N relationships
pass the ID up to the opening brace containing the guid.

## Param 2: displayRule ##
"inline" = Displayed
"none" = Hidden

***********************************************************************************/
function navElementDisplay(navElementID, displayRule) 
{
    var navElement;
    var navElementArray = Xrm.Page.ui.navigation.elements.get();
    
    var i = 0;
    for (i = 0; i < navElementArray.length; i++) 
    {
        elementId = navElementArray[i].$K_0; //element ID Tag
        if (elementId.indexOf(navElementID) != -1) //indexOf fuction returns -1 if not found 
        {
            //If found, step in and get element, using current ID
            navElement = document.getElementById(elementId); 
        }
    }
    //exit loop, Update display rule
    navElement.style.display = displayRule;
}


And invoke it like so...

if(contactType == 100000000)
{
	navElementDisplay(navelement1, "inline");
    	navElementDisplay(navelement2, "none");
}

Hope this helps

Craig

Tuesday 14 June 2011

CRM 2011: Get parent window attribute data, when opening from grid view.


Good day, fine people of the Internet.

A request was handed to me in my day to day work, which required some custom JavaScript work. Essentially, the requirement was for an onLoad event attached to a custom entity, this event must query the parent entity it was opened from, and depending on the result returned, sets the values of various fields on the form.

My custom entity has a relationship of N:1 with contact, however depending on the contact type (customer, supplier etc.) my custom entity will behave differently.

Through various research methods (Google) it seems the standard way to query an attribute on a parent window is to use..

window.parent.opener.Xrm.Page.getAttribute("Attribute_Name")
And to get the attribute’s value / data
window.parent.opener.Xrm.Page.getAttribute("Attribute_Name").getValue();

Great, Job done!!… errr…Not quite.

This scenario is ONLY suitable, when creating my new entity record from the navigation bar link, and hitting new.

For my scenario, I have a grid view on the contact entity, which lists the custom entity records. From here, I can click the grid, and add new record via the ribbon.
lo and behold, my page threw a tantrum along with an error.

After some debugging and a few moments rocking in the corner, I discovered the problem/solution

The problem:
window.parent.opener.Xrm.Page.getAttribute("Attribute_Name") Will not work when launching the entity from a grid view, because you cannot call the getAttribute method! ... WHY?
Because this a "short-cut" to the method used in standard form control, which does not exist when you open a record from a grid.

The solution:
Use this…

window.parent.opener.Xrm.Page.data.entity.attributes.get("Attribute_Name");
And to get the attribute’s value / data
window.parent.opener.Xrm.Page.data.entity.attributes.get("Attribute_Name").getValue();   

NOTE:
If you have a scenario where your record can be opened from both a grid AND the navigation area, this new method will not work for both, It’s only for grid launches.

My overall solution is to use both methods in my events, with a try/catch surrounding them.
Then, my remaining logic begins on whichever is successful.

Hope this helps you..
Craig Hamer

Tuesday 5 April 2011

Dynamics CRM 2011 SDK

Hello Internet..

Microsoft have released their latest SDK for Dynamics CRM 2011.
Its brand new, so haven't had a good play yet..


I'm looking forward to using a new visual studio extension which supports JScript IntelliSense. This will help speed up the writing of  my cheeky form controlling codes

Download here

Monday 21 March 2011

So what happened was....

Hello Internet.

I've not posted in quite some time, but I promise not to be another failed Blogger, so here's a quick update.  I've been out of action for the last few weeks due to injury/Epic fail. 


Inspired by a short-cut provided by phone's GPS software, I managed chose a walking route which led me to a bit of a fall that resulted in having both ankles broken. I'll use this as opportunity to sate the obvious and let you know it hurt quite a lot.


The result of the injury had taken me away from lots of my day to day duties, In particular Dynamics CRM work.  So I'm afraid I've not had much to blog about in recent weeks. 


I'm sure to back into the swing of things very soon, and have plenty to share. I'll shortly begin working on a xRM solution with Dynamics CRM 2011 so any fun interesting finds, tricks or tips will be shared.

All the Best

Craig Hamer


Tuesday 25 January 2011

Dynamics CRM 4 - Basic HTML Source code editor

Good day!

Here's a quick and easy fix for anyone who's struggled with using HTML with Dynamics CRM emails. 


This was born of my need to update the source code of the email body via JavaScript in order to achieve my "Insert email signature" Button.  I was digging around with the Email entity in IE8 Dev tools, and uncovered a potential holy grail of mouthwatering CRM deliciousness..........The  "InnerHTML".


How lovely this was.


Upon completion of the Button, I then realised that if you could write to this InnerHTML via JavaScript, you could surely pass in an existing email's 'source code' into a text area, tweak as required and put it back where it belongs.
And better still, Create a tasty Web based mail with full images, styles and tables using any web content tool and replace the existing mails "InnerHTML" with your source code.

And you know what? It works! - So here's my quick step by step instruction on how to get yourself a new Section of the CRM email entity to edit the source code of your CRM emails.


1) Navigate through  Settings-->Customize Entities-->Email.


2) Under Attributes, click NEW.


3) Create an attribute of type: nText, Display name =  HTML, maximum length =  50000


(the Name should auto-resolve to new_html, if your organisation used an alternate prefix, please note it down for coding later)


4) Save and close.

5) Under Forms and Views, select the main application form.


6) Under common tasks, click add a tab, name it "HTML" or "Source Code" etc.

7) Add a section, and add your  recently created attribute new_html.


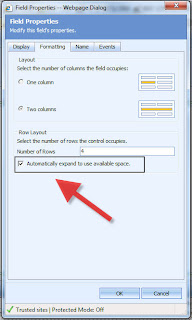
8) Change the properties of the attribute, and expand the area to fill the page. (see right)


Now for the 10000 pages of code...


9) Under form properties, paster the following into the OnLoad event and Enable the event, save and close

//Copy existing Inner HTML and replicates as editable test in New HTML Tab


crmForm.all.new_html.DataValue = document.all['descriptionIFrame'].contentWindow.document.body.innerHTML


10) Double click the description attribute, Select the event tab and paste the same code above into the OnChange - enable the event.
11) Navigate to your new tab on the main form, and double click you nText attribute to open it's properties

12) Paste the following code under the OnChange of the new_html attribute, enable the event.


 //Takes the changes made to the new HTLM tab and applies to the CRM Email Body


document.all['descriptionIFrame'].contentWindow.document.body.innerHTML = crmForm.all.new_html.DataValue

13)  PUBLISH YOUR CHANGES


Now when you open a new email, you will have an an additional tab to control the HTLM content of your emails, this of course opens many doors to some bespoke formatting that cannot be done with the out of box features.


Ps! - If you're playing with images, make sure you use absolute references to hosted files. otherwise, the email that appears in your preview may trick you to thinking that the recipient will also see the images, and they wont.